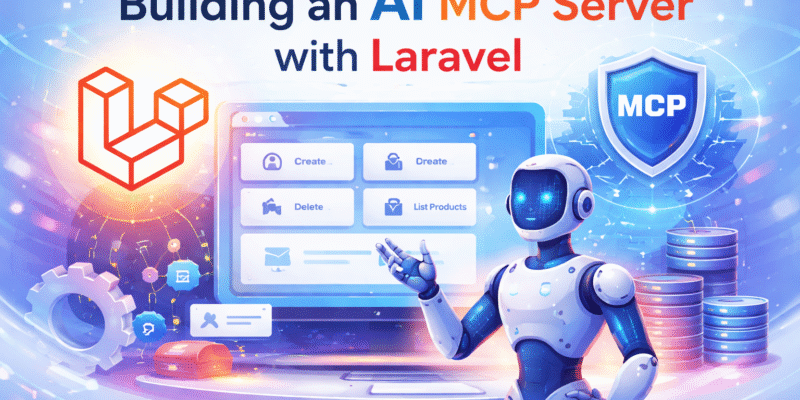
Modern AI systems increasingly rely on structured, tool-aware backends to interact with data, services, and external APIs. One emerging pattern is the Model Context Protocol (MCP) server — a backend that exposes tools, resources, and context in a standardized way for AI models.
In this tutorial, you’ll learn how to build a simple AI MCP server using the Laravel framework. By the end, you’ll have a working backend that can:
- Expose tools/functions to AI agents
- Serve structured context data
- Handle requests in a clean, scalable way
What is an MCP Server?
An MCP (Model Context Protocol) server is a backend that: Defines tools (functions AI can call) Provides structured context (data/resources) Handles execution requests Think of it as a bridge between AI and your application logic.
Using MCP in Laravel
We will use the laravel/mcp package. This package facilitates building MCP servers, and contains the needed features like creating tools, creating, prompts, resources, etc.
Let’s create a brand new laravel project:
laravel new mcp_server_laravel_demo
Next install the laravel/mcp:
composer require laravel/mcp
After successful install, publish the ai-routes file:
hp artisan vendor:publish --tag=ai-routes
This will create the web/ai.php file, where you will register the MCP servers.
Creating new MCP Server
Create a new MCP server using the make:mcp-server command:
php artisan make:mcp-server DashboardServer
Once created a new directory app/Mcp will created inside of the app/ directory. This directory will serve as the container for MCP related files. MCP server classes created inside of app/Mcp/Servers directory.
Open the generated MCP server and set the Name and Instructions like so:
#[Name('Dashboard Server')]
#[Version('0.0.1')]
#[Instructions('This server provides website dashboard information and how to automate dashboard tasks.')]
class DashboardServer extends Server
{
    protected array $tools = [
        //
    ];

    protected array $resources = [
        //
    ];

    protected array $prompts = [
        //
    ];
}
It’s important to set a proper Name and set the Instructions about what this server do, this tells AI Agents about the general context of this server.
Setting up the Name and Instructions done by using #[Name] and #[Instructions] attributes. If you you don’t want to use attributes syntax you can declared them using class properties like so:
class DashboardServer extends Server
{
    protected string $name = 'Dashboard Server';

    protected string $version = '0.0.1';

    protected string $instructions = 'This server provides website dashboard information and how to automate dashboard tasks.';

    ....

}
Registering the MCP Server
Register the new created sever in web/ai.php:
<?php

use Laravel\Mcp\Facades\Mcp;

Mcp::web('/mcp/dashboard', \App\Mcp\Servers\DashboardServer::class);
This server will be used by the Ai clients using the /mcp/dashboard route. This kind of route is called a MCP web server route and is suitable for remote AI clients and will be accessed via HTTP POST request. In that case this server will be used from any web application which can use the MCP server.
However there is another type of MCP server which is the local servers using the Mcp::local() method:
Mcp::local('/mcp/dashboard', \App\Mcp\Servers\DashboardServer::class);
Local servers run as Artisan commands which is suitable for building local AI assistants.
Inpecting the MCP Server
You can inspect the MCP server using the MCP inspector. The MCP inspector used to debug and test the MCP Server:
php artisan mcp:inspector mcp/dashboard
I passed the MCP server route to the mcp:inspector command. Once run this command it will give you instructions of how to connect to your server by Ai clients, and will launch a web-passed interface to connect to MCP server.
 php artisan mcp:inspector mcp/dashboard

   INFO  Starting the MCP Inspector for server [mcp/dashboard].

Transport Type => Streamable HTTP
URL => http://localhost:8000/mcp/dashboard
Secure => Your project must be accessible on HTTP for this to work due to how node manages SSL trust
The example
Let’s apply a real world example with the MCP server. Suppose that you need a way to automate tasks in the admin dashboard of your website.
Let’s consider we have these modules in the admin:
- Products
- Posts
- Users
Let’s create the migrations for these entities:
php artisan make:model Product -m
php artisan make:model Post -m
XXX_create_products_table.php
Schema::create('products', function (Blueprint $table) {
            $table->id();
            $table->string('name');
            $table->text('description')->nullable();
            $table->decimal('price', 10, 2);
            $table->timestamps();
        });
XXX_create_posts_table.php
Schema::create('posts', function (Blueprint $table) {
            $table->id();
            $table->string('title');
            $table->text('content')->nullable();
            $table->timestamps();
        });
Migrate the tables:
php artisan migrate
Update models fillables:
app/Models/Product.php
<?php

namespace App\Models;

use Illuminate\Database\Eloquent\Attributes\Fillable;
use Illuminate\Database\Eloquent\Model;

#[Fillable(['name', 'price', 'description'])]
class Product extends Model
{
    //
}
app/Models/Post.php
<?php

namespace App\Models;

use Illuminate\Database\Eloquent\Attributes\Fillable;
use Illuminate\Database\Eloquent\Model;

#[Fillable(['title', 'content'])]
class Post extends Model
{
    //
}
Creating MCP tool
Create an MCP tool that inserts a new product into DB:
php artisan make:mcp-tool CreateProductTool
The make:mcp-tool command creates a new tool class in the app/Mcp/Tools/ directory.
Tools Represents the operations to implement in the MCP server by AI Clients. Open the Tools/CreateProductTool.php and update it like so:
<?php

namespace App\Mcp\Tools;

use App\Models\Product;
use Illuminate\Contracts\JsonSchema\JsonSchema;
use Laravel\Mcp\Request;
use Laravel\Mcp\Response;
use Laravel\Mcp\Server\Attributes\Description;
use Laravel\Mcp\Server\Attributes\Name;
use Laravel\Mcp\Server\Attributes\Title;
use Laravel\Mcp\Server\Tool;

#[Name('create-product')]
#[Title('Create Product')]
#[Description('Create a new product into DB using the given data.')]
class CreateProductTool extends Tool
{
    /**
     * Handle the tool request.
     */
    public function handle(Request $request): Response
    {
        $validated = $request->validate([
           'name' => 'required|string',
           'price' => 'required|numeric',
           'description' => 'nullable|string'
        ]);

        $product = Product::create($validated);

        return Response::text("Product created with id: {$product->id}");
    }

    /**
     * Get the tool's input schema.
     *
     * @return array<string, JsonSchema>
     */
    public function schema(JsonSchema $schema): array
    {
        return [
            'name' => $schema->string()
                ->description('The name of the product.')
                ->required(),

            'description' => $schema->string()
                    ->description('The description of the product.'),

            'price' => $schema->number()
                    ->description('The price of the product.')
                    ->required()
        ];
    }
}
The tool class structure as below, a skeleton tool class contains the handle() and schema() methods. You should provide meaningful descriptions and titles for the tools so that Ai Agents can infer the context of the title.
I added a name and title for the tool using Laravel\Mcp\Server\Attributes\Name and Laravel\Mcp\Server\Attributes\Title attributes. And also added a description with the #[Description] attribute.
The schema() method, this is where you define input schemas from AI clients. For the above tool, we need the product name, description and the price:
return [
            'name' => $schema->string()
                ->description('The name of the product.')
                ->required(),

            'description' => $schema->string()
                    ->description('The description of the product.'),

            'price' => $schema->number()
                    ->description('The price of the product.')
                    ->required()
        ];
The handle() method do the actual processing of the tool and must return a Laravel/Mcp/Response instance. An optional validation can be done for the input data arguments using laravel validators as in the above code and then creating the product and finally return the response.
Registering the tool
It’s important to register the tool class in the MCP server class. Open the DashboardServer.php class and register the tool in the $tools property:
....

class DashboardServer extends Server
{
    protected array $tools = [
        App\Mcp\Tools\CreateProductTool::class
    ];

   ...
}
Testing the tool
There are many ways to test the MCP tools:
- Using the MCP inspector as described above
- Using Claude cli
- Invoking the mcp server from a AI clients like OpenAi or Claude Api’s
How to use the MCP inspector:
- First check the .env
APP_URLpoints to the web app actual url. For local development this can be http://localhost:8000. - Launch the project with
php artisan serve. - In another terminal run
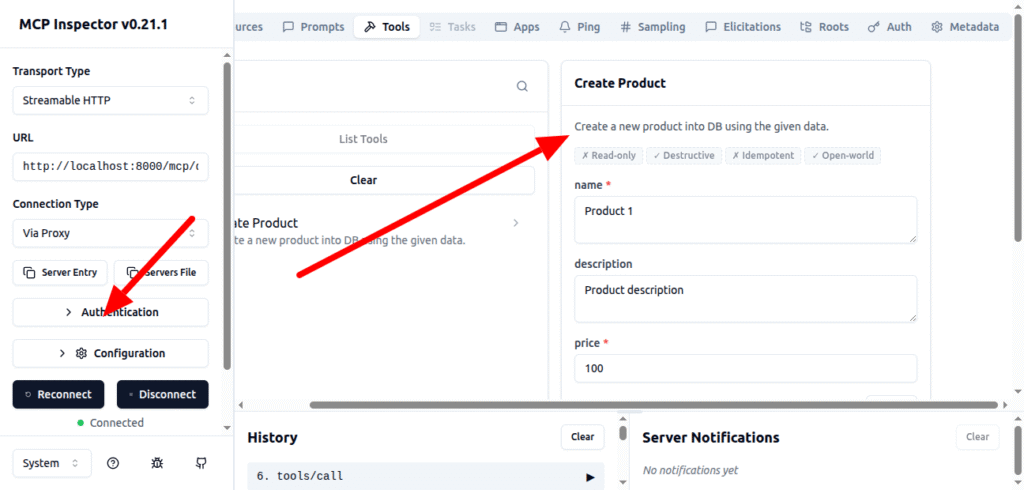
php artisan mcp:inspector mcp/dashboard. Once this command runs it will open a web interface and you can view the tools, resources and open any tool as in the figure:
How to use the Claude cli to register mcp servers:
Using the command:
claude mcp add --transport http <server_name> https://<url>
Modify this command according to our example server:
claude mcp add --transport http laravel_app http://localhost:8000/mcp/dashboard
Now if you check the claude mcp servers:
claude mcp list
It should say:
Checking MCP server health...

laravel_app: http://localhost:8000/mcp/dashboard (HTTP) - ✓ Connected
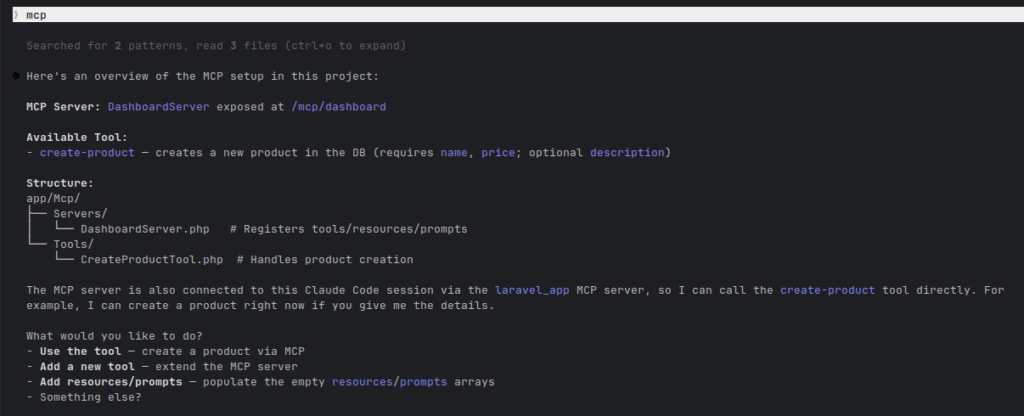
After that open a claude session in terminal in the project root and type mcp, it should detect the mcp servers and tools and list them. You can select any tool and follow the steps like shown in this figure:
Tool Responses
Right now the tool response is a text:
Response::text("Product created with id: {$product->id}");
However there are other response methods you can use like
Response::image()to return image contentResponse::audio()to return audio contentResponse::structured()to return structured dataResponse::error()to return error
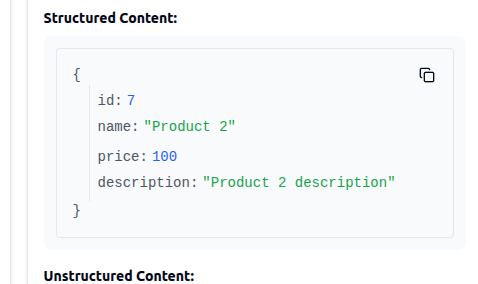
Let’s replace the Response::text() in the example with Response::structured():
return Response::structured([
            "id" => $product->id,
            "name" => $product->name,
            "price" => $product->price,
            "description" => $product->description
        ]);
Update & Deleting Product Tool
Create another tool for updating and deleting product:
php artisan make:mcp-tool UpdateProductTool
php artisan make:mcp-tool DeleteProductTool
app/Mcp/Tools/UpdateProductTool.php
#[Name('update-product')]
#[Title('Update Product')]
#[Description('Update product by id and given data.')]
class UpdateProductTool extends Tool
{
    /**
     * Handle the tool request.
     */
    public function handle(Request $request): Response
    {
        $validated = $request->validate([
            'id' => 'required|numeric',
            'name' => 'required|string',
            'price' => 'required|numeric',
            'description' => 'nullable|string'
        ]);

        $product = Product::find($validated['id']);

        if(!$product) {
            return Response::error("Product not found.");
        }

        $product->update($validated);

        return Response::text("Product #{$product->id} updated successfully.");
    }

    /**
     * Get the tool's input schema.
     *
     * @return array<string, JsonSchema>
     */
    public function schema(JsonSchema $schema): array
    {
        return [
            'id' => $schema->number()
                    ->description('The id of the product.')
                    ->required(),
            'name' => $schema->string()
                ->description('The name of the product.')
                ->required(),

            'description' => $schema->string()
                ->description('The description of the product.'),

            'price' => $schema->number()
                ->description('The price of the product.')
                ->required()
        ];
    }
}
app/Mcp/Tools/DeleteProductTool.php
#[Name('delete-product')]
#[Title('Delete Product')]
#[Description('Delete product by id.')]
class DeleteProductTool extends Tool
{
    /**
     * Handle the tool request.
     */
    public function handle(Request $request): Response
    {
        $product = Product::find($request->get("id"));

        if(!$product) {
            return Response::error("Product not found.");
        }

        $product->delete();

        return Response::text("Product #{$product->id} deleted!.");
    }

    /**
     * Get the tool's input schema.
     *
     * @return array<string, JsonSchema>
     */
    public function schema(JsonSchema $schema): array
    {
        return [
            'id' => $schema->number()
                ->description('The id of the product to delete (required).')
                ->required()
        ];
    }
}
As shown in the DeleteProductTool code it’s similar to the CreateProductTool, except that it the handle() method finds a product by id, and if it’s not found it return an error response using Response::error(). Also the schemas() method add the “id” to the input schema.
Register the tool inside the DashboardServer.php:
<?php

use App\Mcp\Tools\CreateProductTool;
use App\Mcp\Tools\UpdateProductTool;
use App\Mcp\Tools\DeleteProductTool;

....

class DashboardServer extends Server
{
    protected array $tools = [
        CreateProductTool::class,
        UpdateProductTool::class,
        DeleteProductTool::class
    ];


?>
Now these tools will be discover-able and shown in the MCP inspector web interface.
Using the MCP Server With In Other Web Applications
You can use and expose the MCP Server we just created in other web applications that uses OpenAi or Claude Api’s. For example you can use it in OpenAi Responses Api like shown:
import OpenAI from "openai";

const client = new OpenAI();

const response = await client.responses.create({
    model: "gpt-5.4", // 2026 flagship model
    tools: [
        {
            type: "mcp",
            server_url: "https://xyz.ngrok-free.app/mcp/laravel",
            server_label: "dashboard_server",
            server_description: "Access to the Laravel database and product creation tools."
        }
    ],
    input: [
        {
            role: "user",
            content: "Create a product named 'OpenAI Mug' for $15."
        }
    ]
});

console.log(response.output_text);